This Usd exporter was designed for my final year university film, and was born from the necessity to
rewrite Usd assets coming from Maya in a meaningful and structured way. The goal was to make asset
sublayering as simple as possible between geometry, materials and animation, while also allowing for
scalability between softwares, as well as for additional sublayering of groom and such if an asset so
requires.
I decided the best approach to this was to write a python module that takes in an input Usd file and
rewrites it, rather than trying to export directly from a software, or even the thought of restructuring
an asset inside of Houdini where you have much greater control in how a Usd asset will behave. The largest
advantage of this I feel is that due to it being decoupled from any software directly, any software can
use this python module to generate consistent Usd asset hierarchies across projects with minimal work, just
requiring a front end Ui like Qt or even just a Houdini HDA. The one caveat to this is that this tool is
designed with my final year film in mind, and so some decisions I have made, I made with the needs of my film
in mind, prioritising a working tool for what we need over a tool that works for every occassion.
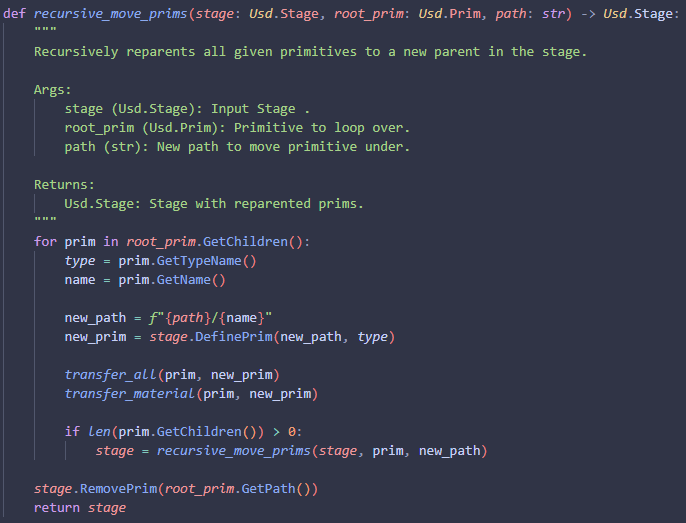
The first function that I knew I would need was a way to move one primitive from one path to another. due to
Usd being immutable once it's been created, the next best thing I could do was to take a primitive, create a
new primitive of the same type under this new location, and then copy over the properties of one to another,
before finally removing the original.
This I imagine it working something akin to the idea reparenting, and so one choice I made was to copy over
all the children of the given root primitive recursively, but this does not copy over the root prim itself.
The reason for this is if I have all my components of a model under a single group node in Maya for instance,
When I export my asset, I want to change that root node to have the same root path as the asset name in my
folder structure, and so rather than having the user manually input the name of the asset as the group name,
I am replacing the group entirely with the correct name which I get from my re-exporter class, something I
will be going into a bit later in on this page.
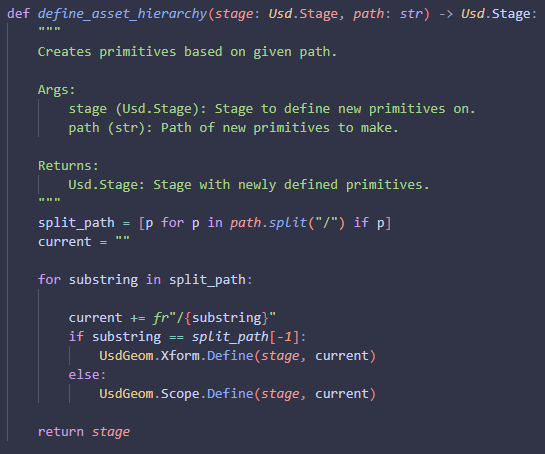
Keeping the last function in mind, the next thing I knew I would need was a way to define my new asset
hierarchy to reparent the incoming primitives to. I decided for my hierarchy, I wanted all nodes above
the asset name itself, to be defined as a scope, and then for the asset itself, I want that to be an
xform. The reason for this is I wanted the asset root to be xformable, meaning the primitive has the
ability to be transformed, but I don't want someone to accidentally move all assets when they only
meant to move one as an example.
I decided the easiest way to manage this was to just take a string input of the path, where each primitive
is dictated by a "/" and split them out that way. From there I am just looping through and adding the new
primitive to the previous path recursively, until all primitives have been defined.
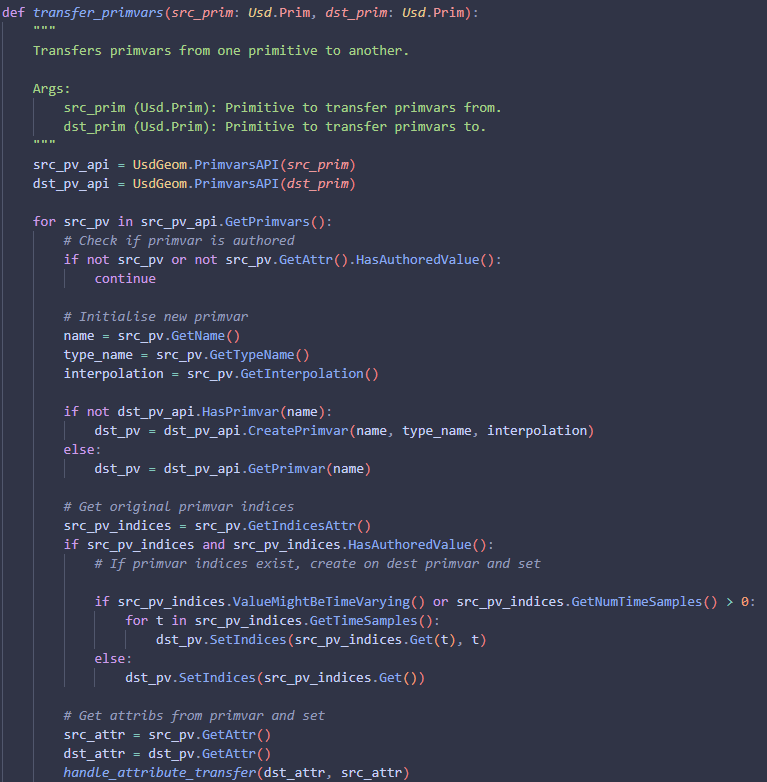
Now for something that caused me more problems than I would like to admit. Transfering attributes is easy
enough, just using their respective Get() and Set() methods. Sadly primvars and xforms seemed to have some
additional hoops to jump through before being able to copy them from one primitive to another.
I start by getting the source primitive's primvars api and loop through all the primvars on that api. I
check if the primvar has an authored value, and if it does, I create the primvar on the new primitive.
I then get the source primvars indices, and check if those exist and have been authored. If they have,
I loop through and set them depending on if they are time sampled or not. I then get the attribute associated
with the current primvar and I transfer the attribute from one to another. The "handle attribute transfer"
function is just a wrapper for checking if an attribute is time sampled, and setting based on that. It's the
exact same type of thing as the indices attribute transfer you see here, but for attributes in general.
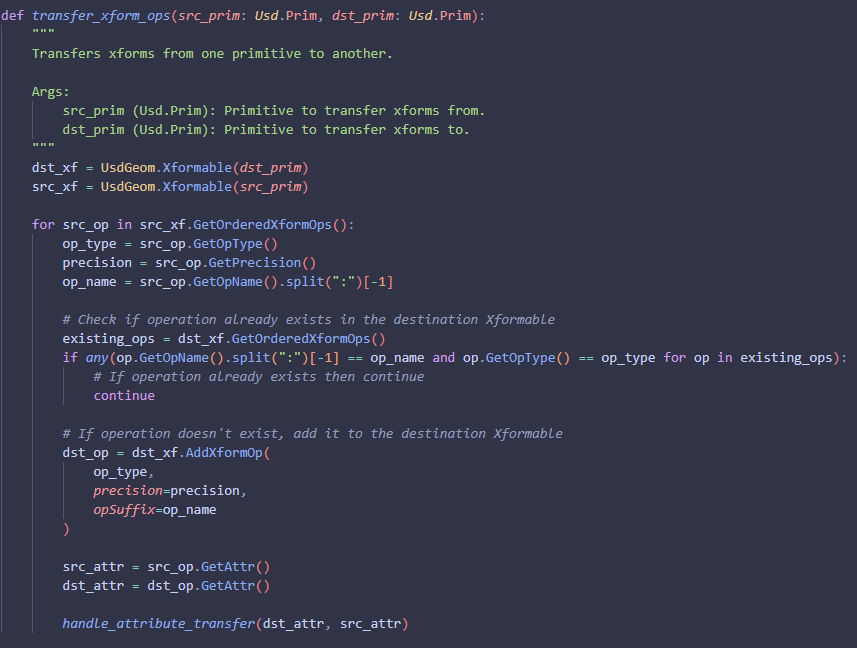
Now for the xforms. I start by getting the xformable of the source prim, and then loop through all of the
xforms on that xformable. If the xformable exists on the destination prims xform then I skip over creating it,
otherwise I make a new xform with the type, precision and name of the source xform. Once that is done I get the
attribute for both and run it through my handle attribute transfer function.
Just to quickly go over some other functions I have, but are small enough that I don't feel it'd be worth dedicating
a section to them individually. I have a wrapper function for flattening stage and returning the new opened layer. I
also have a function that just loops through at gets all the primitives directly under "/" in the given usd stage.
Alongside these, I have functions for removing meshes and materials, these functions are useful for when I'm exporting
out of Maya, so for example with the materials function I want to get rid of any initial shading group data from my
prims, as well as any assigned textures from the mesh during the initial export. As for removing meshes, this is for
when I am exporting cameras, I bring the fbx camera from syntheyes into Maya, and then run it through that to get rid
of anything like the camera plane grid that can come from a syntheyes export.
One other function that I do think deserved talking about was how I am transfering materials from Maya to Houdini.
The pipeline we use is to create and assign shaders inside of Houdini as a separate Usd layer. The generalist on
my team however finds it easier to assign materials inside of Maya, and we found that the implementation of materialx
in Maya seemed to have some issues in the version we are using, so exporting materials directly was a no go.
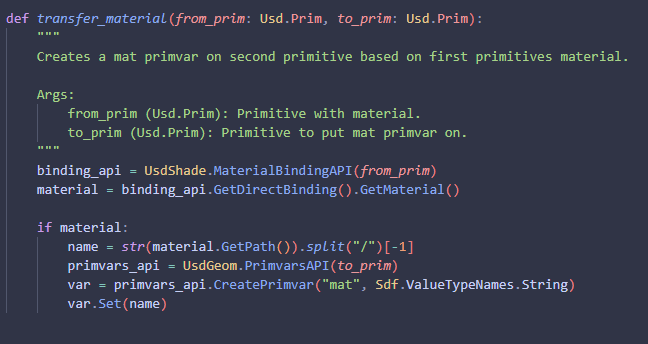
The solution? A method of taking the assigned material and tagging it as a custom primvar. I do this through the
UsdShade material binding api, and get the material bound on per prim. If there is a binding, I get the name, grab
the primvar api of that prim, create a new "mat" primvar, and set it to be the value of the bound material's name.
This runs through an auto material assigner HDA I made which read's the mat primvar and creates materials for each
of it's unique values.
The next thing I worked on is what I, for all intensive purposes, refer to as my usd validators. These are the
scripts I run over the input stage to clear out additional information that I don't want, need, or is just redundant.
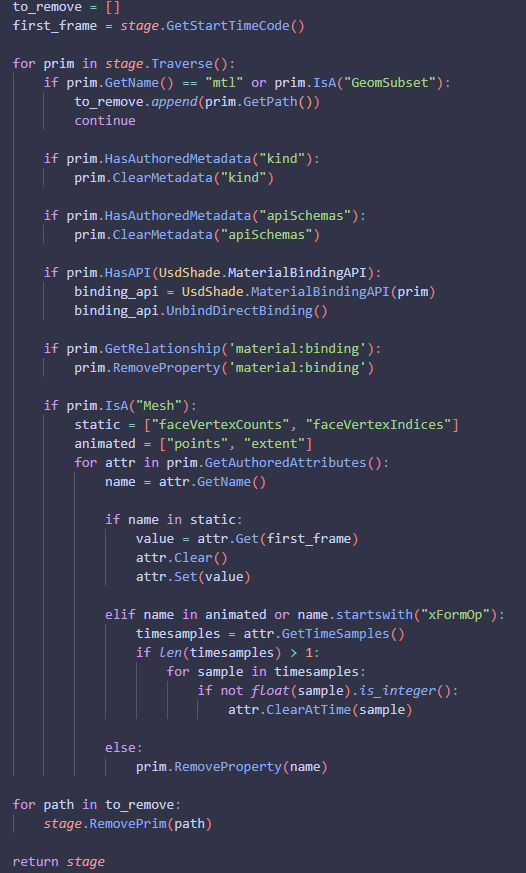
Here is the animation validator function. I take the input stage, as well as getting the start time code of the stage,
and I loop through each prim in the stage. If the prim name is "mtl" or the prim is a geometry subset, i add them to a
list which I am removing later. I don't remove them instantly because of an error that started coming up with trying to
access a prim that no longer exists, I'm sure there's a better way of doing it performance wise, but it is beyond negligable
for our use case. I then remove any kind or apischemas metadata, as well as clearing any material bindings.
Once that is done, I check if the prim is a mesh, and if it is I get the authored attributes on the mesh, and if the
value is in the static or animated lists that I created, I clear and set them accordingly. The reason for this is to
remove any time dependencies or subframes that I don't need, lightening my Usd files. Finally after all of that is done,
I remove the paths that I grabbed in a list previously.
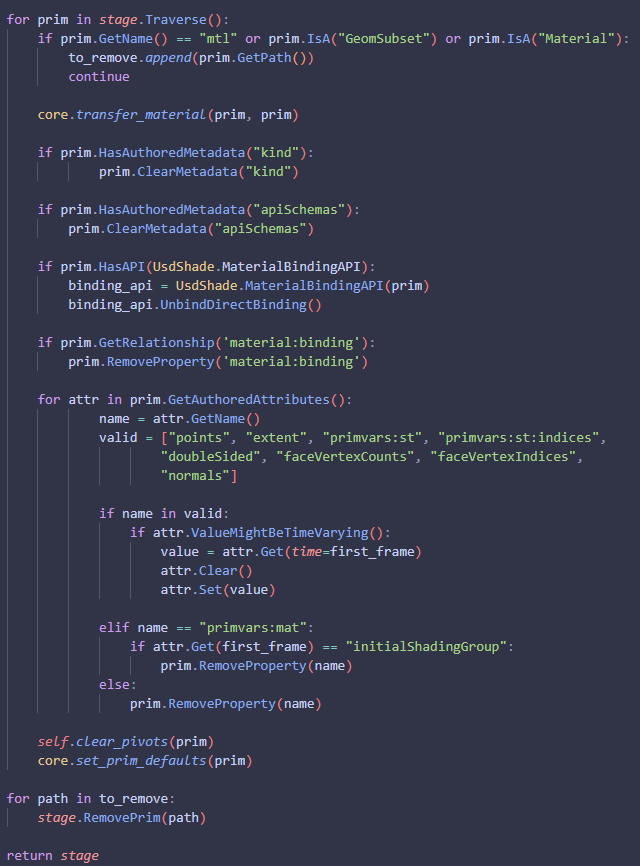
Next is my geometry validator. I loop through each prim in the current stage and check if it's a geometry subset, a
material, or has the name "mtl", and if it does, I add it to the group that I am removing later. The reason I add the
clause for "mtl" as the prim name, is because I know this tool is going to be used in Maya, and for all intensive purpose,
I don't think geometry will be coming out of other software aside from Maya for my film, and so I am targetting any of the
standard surfaces that maya may try to drag along on initial export and removing them here.
Once that's done I run my material transfer script to take any materials currently applied on the old prim and convert that
to a primvar which is going to be transfered later. I then remove kinds, api Schemas, any material bindings and any material
relationships.
<<<<<<< HEAD
After that, I loop through all the authored attributes on the primitive, and match them to the attributes that I am wanting to
keep on the prim. If the name of the attribute matches one of the values in the list then I remove time dependencies from the
attribute and set it to the value on the first frame. Otherwise I remove the attribute. The one caveat to this is with the mat
primvar I created earlier. If that has the value of "initialShadingGroup" then I clear it, otherwise I keep it as it is.
Finally I go through and clear the pivots on the prim, I set some generic defaults like subdivision schema and then I loop through
and remove the list of prims that I marked for removal earlier. Once this is all done I return the editted stage.
=======
>>>>>>> c272f4606547e8bb5f3cac43b45641d24713b57a
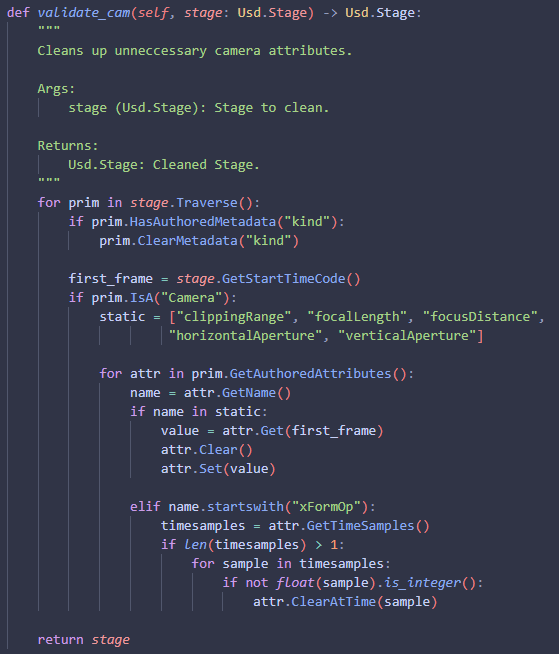
Finally I have my camera validator. This loops through the prims in the given stage, first clearing kind metadata, before then
getting the start time code. It then checks if the prim is a camera prim, and if so, loops through the authored attributes on
that camera, looping for static attributes like focal length, and removes any potential time dependencies on them. If the attribute
is not in that list, it checks if the attribute is an xformop, and if so, converts it to only save integer frame number values.
Finally it returns the editted stage.
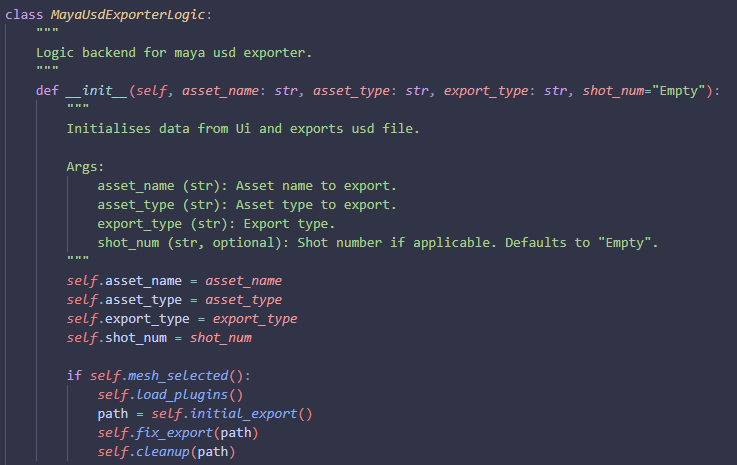
I then wrapped this in a shelf tool for Maya. The logic component behind it takes an asset type, asset name, export type and
shot number. When called it then checks if a mesh is selected. If one is, it loads Maya's usd plugin if it hasn't already been
loaded. It then runs an initial export using Maya's default usd exporter to a temp file, with the path being returned as a
variable. From there I run this through my fix export script before finally deleting the temp file.
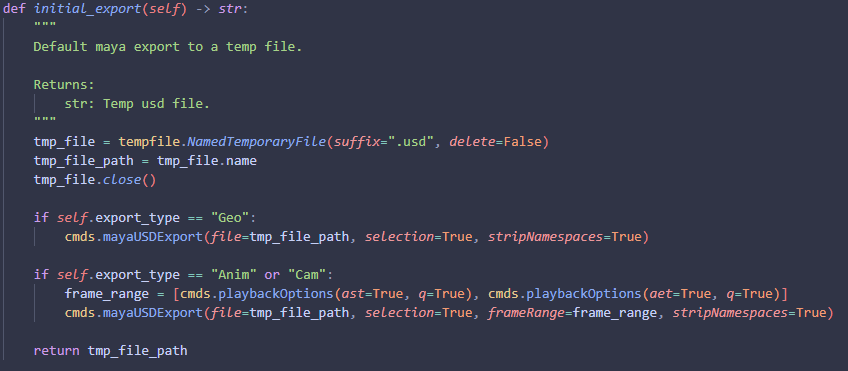
The initial export script creates a temp usd file, and then based on export type, it exports using some default settings, like
frame range, selection being true, as well as stripping namespaces.
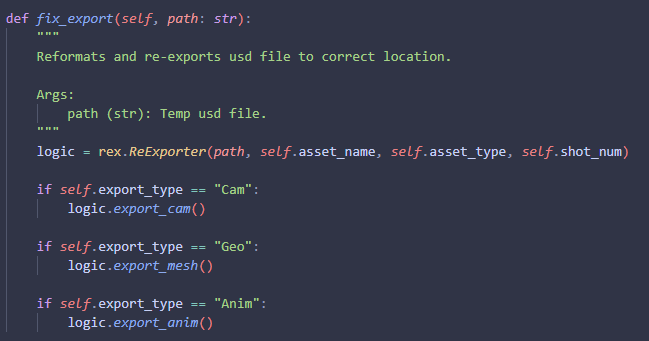
The fix export script then runs the re-exporter scripts from above dependent on export type.
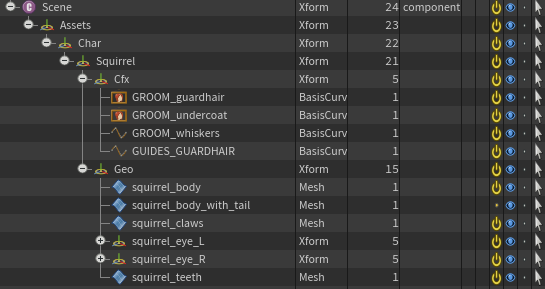
The resulting usd hierarchy from my exports looks like this in Houdini.